

The key element of this instructor grid is the schema blocks. These blocks are defined as follows
  "blocks":{
    "label":"Add instructor",
    "limit":2000,
    "types":[
      {
        "type":"instructor",
        "label":"Instructor bio",
        "settings":[
          {
            "type":"instructor_picker",
            "id":"instructor",
            "label":"Instructor"
          },
          {
            "type":"page_picker",
            "id":"instructor_link",
            "label":"Select Instructor Page"
          }
        ]
      }
    ],
    "defaults":[]
  }
The blocks consist of two elements, the Instructor Picker which is used to select which of the built in Thinkific Instructors to pull content from and the Page Picker which is used to determine where a click action will take the site visitor.
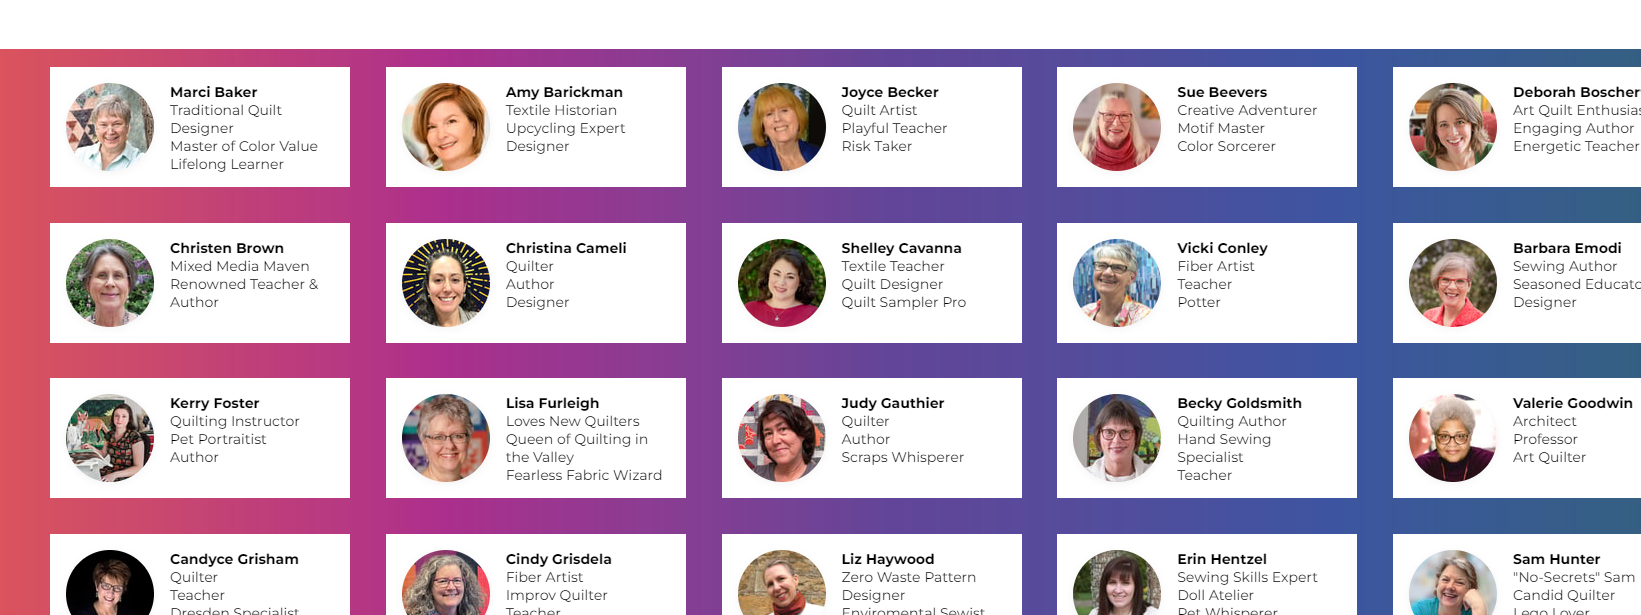
The instructor image, name and title are extracted through the data returned by the Instructor Picker. The entire instructor area is wrapped in the link returned by the Page Picker.
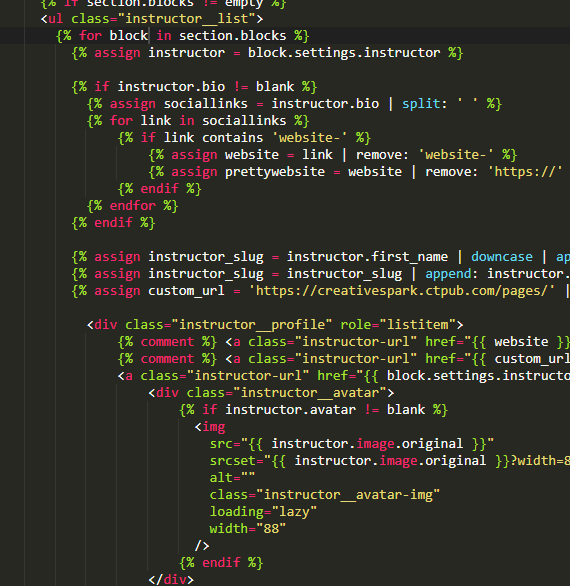
<div class="instructor__profile" role="listitem">
    <a class="instructor-url" href="{{ block.settings.instructor_link }}">
        <div class="instructor__avatar">
            {% if instructor.avatar != blank %}
                <img src="{{ instructor.image.original }}" srcset="{{ instructor.image.original }}?width=88 1x, {{ instructor.image.original }}?width=88&dpr=2 2x, {{ instructor.image.original }}?width=88&dpr=3 3x" alt="{{ instructor.full_name }}" class="instructor__avatar-img" loading="lazy" width="88"/>
            {% endif %}
        </div>
        <div class="instructor__details">
            <h3 class="instructor__name">{{ instructor.full_name }}</h3>
            {% if instructor.title != blank %}
                <p class="instructor__title">{{ instructor.title }}</p>
            {% endif %}
         </div>
    </a>
</div>
The instructor__title unfortunately doesn’t have the ability for HTML formatting, therefore, I wrote a script to split the entry into new lines based on the presence of a comma.
<script>
$(document).ready(function () {
     $('.instructor__title').each(function () {
          var unformatted = $(this).html();
          var formattedString = unformatted.split(",").join("<br />")
          $(this).html(formattedString);
     });
});
</script>
This script will change Fiber Artist, Improv Quilter, Teacher into
<p class="instructor__title">
     Fiber Artist<br> Improv Quilter<br> Teacher
</p>
which allows for each element of an instructor’s credentials to display on its own line within the profile box
The instructor__profile divs are contained within the instructor__list div. On desktop the profiles are displayed at 300px wide (resulting in 4 or 5 across), on tablets, they are displaedy at 31% of the screen width (resulting in 3 across) on mobile they are stacked (one per row.)
.instructor__list {
    display: flex;
    background-image: url("{{ 'ombre tile copy.jpg' | theme_asset_url }}");
    background-size: contain;
    margin-left: auto;
    margin-right: auto;
    max-width: 1800px;
    justify-content: center !important;
    flex-wrap: wrap;

    .instructor__profile {
        display: flex;
        flex: 0 0 100%;
        max-width: 23%;
        max-width: 300px;
        margin: 1%;
        background: #ffffff;

        @include screen-md-max {
            max-width: 31%;
        }

        @include screen-sm-max {
            max-width: 94%;
            margin-top: 1rem;
        }
    }

    .instructor-url {
        display: flex;
        text-decoration: none;
    }

    .instructor__avatar {
        display: flex;
        max-width: 150px;
        flex: 0 0 33%;

        img {
            border-radius: 50%;
            height: 88px;
            width: 88px;
        }
    }

    .instructor__avatar-img {
        display: flex;
    }

    .instructor__details {
        padding-right: 1rem;
    }

    .instructor__name,
    .instructor__title {
        font-size: 13px;
    }
}
New instructors can easily be added to this page by adding new Instructor Blocks.
All multi-instructor Thinkific sites can benefit from displaying their instructors on an easy to access